Monday, August 31, 2009

August To-Do List Results

I posted this to-do list earlier this month with my goals for August. In the interest of accountability, here is how I have progressed!

A. Hallway/Stairs:


1. Select Paint color for hallway and stairwell--right now is down to 4 favorites: Sepia Tan, Fennel Seed, Boardwalk Brown, and

2. Spackle around banister--because I pulled the old paint off by accident when I left masking tape up for approximately 6 months

3. Paint hallway and stairwell--that's the point of spackling and selecting a paint color!


B. Mudroom (see previous post!)


1. Cut and install risers in mudroom stairs--we already measured and bought the boards. I think this will make the room look a lot neater

2. Prime mudroom stairs with oil-based primer--because they are nekked wood!

3. Finish mudding and sanding drywall in mudroom--because right now there are still nail holes

4. Prime mudroom with special drywall primer--so the drywall doesn't soak up whatever paint we decide to apply


5. Install moulding/shelf in mudroom--to hide weird place where drywall changes to cement block

6. Paint mudroom ceiling--because right now its brown drywall with white drywall tape accross it

7. Either make or buy a ceiling fixture for mudroom--because bare bulb is not flattering


C.
Furniture: (see previous post!)

1. Reupholster and paint pink chairs--probably shiny black paint, or possibly olive green

2. Reupholster and paint stool--I think I will paint it gray and add this Amy Butler Fabric

3. Revitalize old Fruit Growers table--and by revitalize I mean stabilize!


D. Misc.:


1. Put pictures up on the walls--because we sure can't see them in the boxes

2. Locate and destroy poison ivy in backyard--nuff said

3. Make upholstered display for brooches--need to decide on color scheme and then I'm ready!

I think I did pretty well, n’est-ce pas? The hallway is done, and the mudroom has progressed quite well. I got one thing done from the “Furniture” and “Misc” sections as well! I guess a few things will just have to go on September…


Saturday, August 29, 2009

Web Personas

I was reading on CNN.com about the resurgence of portraits as a result of social media, and there was a link to the MIT-based Personas project. Apparently, this is how the internet sees me:


You type in your name at the prompt and it analyzes data about you on the web to learn about you--or how you are PERCEIVED by your cookies, your searches, your web shopping, articles published about you on the web, and whatnot. Above is the result of my entering my first and last names. Very interesting no? The largest sections are "Family" and "Education." It makse sense that "Education" is big because there was alot online when I graduated from high school and college and law school. I think "Family" is so big because there was someone else with my name who lived in 17th century France who is in a lot of geneology charts. The "Sports" section is big. WHY?? So is "Management." Eh?


Ok, so here is what it looks like if I put in my first, middle, and last names:


Really strange, huh? Has anyone else done this little experiment? Is how the internet perceives you different than how you perceive yourself??


Friday, August 28, 2009

My Third Attempt at Dry Point--The Bike

The plate:

One of the prints:

What it would look like in a frame!

Thursday, August 27, 2009

Dreadful Pink Chair Makeover...Part 1

I have salvaged these chairs with great bones from furniture exile. You all might remember them from my post The Island of Misfit Furniture? Well this post is dedicated solely to the chairs! Here is a photo of the chairs where they have lived for years and years...my parents barn!

My great grandmother Hazel painted them PINK and then "antiqued" them with gold. Apparently that was in fashion in the 50's?? But I love their fleur-de-lis detail and the delicate backs, so I decided to rescue them and make them glamorous once again! This photo is the day we got them out of the barn and scrubbed them free of dust and grime (they were so happy to see sunlight!).
I forgot to take pictures of the "during," but here the chairs are after a light sanding and a few coats of glossy black spray paint. It was (surprisingly?) hard to get coverage over that shocking pink. I think they are so graceful now! My dad made supports for the seats because some of them were missing seats entirely, and now its time to upholster! Here is where y'all come in: Please leave me a comment--which fabric do you prefer? Things to keep in mind: will I get totally sick of the fabric? Also, I want to be able to move these chairs from room to room depending on where I need them. I don't want them to be too boring though!


Fabric Choice A: Amy Butler. Very modern and MOD. Gray and yellow--my current favorite color combination.

Fabric Choice B: Jungle Print. This was the losing fabric from my Footstool Makeover.
Fabric Choice 3: This neutral ikat. I am loving brown with black right now, and although ikat is very trendy right now, I think it has staying power. Am I deluding myself? Also, is this absurd with fleur-de-lis?
Fabric Choice 4: This one is a textured monochromatic tromp-l'oeil, in VERY neutral beige. Is it too light so that it will show stains and marks? I think this is the most traditional fabric by a long shot--is it too boring?

PLEASE PLEASE PLEASE post comments because I would love input on this!!

Wednesday, August 26, 2009

Explanation and My Second Attempt at Dry Point--The Succulent

In response to the general confusion created by yesterday's post, here is a brief explanation of dry point!

Dry point is a method of intaglio printmaking. In italian, intaglio means "to incise" or "to carve". There are a bunch of other methods you can use to make prints, inlcuding etchings (YES like "do you want to come up and see my etchings?"), aquatints, mezzotints, etc. You can combine the methods to make a very complicated and layered print, or you can use only one to make it more simple. Its kind of like how you can just grill some chicken or you can marinate, poach, then grill the chicken for a different effect

To make a dry point print, lines are scratched directly into a metal or plexiglass plate. When you scratch lines into the metal, you get depressed lines and burrs, which are the raised up extra bits of metal that come out when you scratch out the lines. You don't clean off the burrs in dry point like you do in some other printmaking techniques. You wipe your plate with ink, and the ink settles down into the depressed lines and falls off of the smooth metal parts. The burrs soak up a TON of ink and give dry point prints their characteristic fuzzy irregular lines. You can't really predict what kind of effect the burr will make, so its kind of like watercolor in that you kind of desire these surprise effects. After you ink your plate, you put it through a press, which you can see on this youtube video (I recommend starting it at the 7 minute mark unless you want a complete tutorial!

Ok, now onto my second-ever dry point forray...

The plate:

The first printing (overwiped):
Another one of the prints:What it would look like in a frame!

Tuesday, August 25, 2009

My First Attempt at Dry Point--The Ball

The plate:

One of the prints:Another one of the prints:
What it would look like in a frame!


Monday, August 24, 2009

Game Inspired Decor

Ya'll know I love a theme. And seeing as Brett and I registered for board games and yard games for our wedding presents, WE LOVE PLAYING GAMES!! I just think a party's not a party without some good-natured competition. So I decided to combine my love of games and themes to post on game-inspired home decor!

First off we have this horseshoe wine rack! I think its just enough country-western style without being tacky (ummm unless you already have antlers on your wall or something). PLUS the horseshoes are placed the right way so the luck doesn't run out. :-)(Cabin Fever Gifts)

I ALWAYS wanted to be the dog in monopoly, (and if that was taken, the shoe, natch). Wouldn't this giant monebags pooch be an adorable paperweight for a like-minded monopoly fan?
(GreatBigStuff.com)

This is an idea I love from the now-defunct Blueprint Magazine. The basic idea is to scan in a playing card and have it blow up to poster size. The one they use in this photo is apretty traditional card design, which is what makes it identifiable. (If they had chosen some novelty card like puppies it might not have made sense next to the three of clubs.) I think its interesting how intricate the design is on the playing card, but it never really gets appreciated as art.
(Blueprint via MarthaStewart.com)


This is a playful take on the trend of putting words up as art. I'm sure you've seen the now trite "Bistro" signs for your kitchen, etc. This would be so cute in a rec room, or in a scrabble-lover's space! My inlaws are crazy scrabble players--they have taught me that a big vocabulary is NOT what is necessary to win at scrabble! You can custom order these tiles to say anything you want, and the are only about $6 per tile!
(GreatBigStuff.com)

This is a great idea for a rustic centerpiece in the summertime if you have some old croquet balls laying around. How cute would this be on a back porch or at a summer house by a lake?
(Ehow.com)

But if you don't have the real thing, here are some preppy drapery rods with croquet ball finnials! I think these would be nice in a little boy's room.
(Bed Bath & Beyond)

This is a giant domino. You can order them with any combination of dots, and I think they would be very chic on a wall displayed with family photos in a gallery-style installation. I think I saw something like that a few years ago in a pottery barn catalogue, but I couldn't find the picture of that anywhere. Anyway, imagine 5 of these on a wall painted a saturated color.

(GiantChess.com)


In researching this post, I came across a website called greatbigstuff.com. Its kind of hilarious, and you can get extra large ANYTHING there. I highly recommend a visit for entertainment and possble halloween costume ideas! Among their cache of giant items are these huge jacks which are really modern as bookends! I have NO idea who selected the CDs used in their display, however. Try to block those CDs out of your mind and imagine them used in a bookshelf, built-ins, or in a modern display or entertainment center.
(GreatBigStuff.com)

And finally, we have this Bocce Ball lamp that has been making waves in the blogosphere since being featured on Apartment Therapy. A lot of people don't know you can make a lamp out of ANYTHING with a lamp kit and a little ingenuity, and I think this would be super cute made out of bocce balls, baseballs, softballs, tennis balls, whatever. Brett would love a lamp like this made out of baseballs--unfortunately, he doesn't have a man cave to display it in! Maybe his office by the framed Red Sox newspaper article?
(Apartment Therapy)


Obviously I wouldn't put all of these in the same room, but I think one or two of them in your house would show off your personality and hobbies and add a punch of fun! Do you think any of these are really horrible?? Do you have any decoration inspired by your favorite games?

Friday, August 21, 2009

New Travel Desire: Mesa Verde


I found this picture by Shelley Munro on one of my favorite blogs, coco + kelley, and am now having daydreams of painting dusty steer skulls with tumbleweed blowing by as I climb around on big rocks a la Laura Croft.

(via Photobucket)

(via Photobucket)

It must be Friday, my brain needs a break!

But seriously, has anyone ever been there? I LOVE Native American art and culture. If anybody has any great tips about how to schedule a vacation in the area, speak up!

Thursday, August 20, 2009

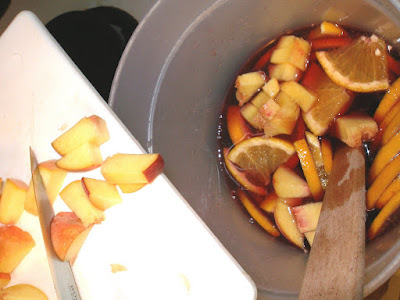
Peach Sangria

Ingredients:
1 bottle of sweet red wine per 2 oz. brandy
gobs and gobs of peaches and oranges

Instructions:
1. Chop up all the fruit. You want to make sure the pieces are small enough that you can pour them easily into your wine glass.
2. Soak the cut fruit in the brandy preferably overnight.
3. Add one bottle of sweet red wine to the fruit and brandy per 2 oz. of brandy


Chopping up peaches

Adding the peaches to the oranges which were already in the liquid. We added some halved grapes and pieces of apple for good measure.

Pouring in my dad's Blackberry Cabernet...Dad, its PERFECT for sangria!


Look at that beautiful peachy golden color. Unfortunately it was gone before I got to take a picture of it in the glass!

Wednesday, August 19, 2009

Hallway and Stairwell Get a Facelift

THE STAIRWELL:

Before:

After:


Whew! Now that we got the dramatic reveal over, here are the details! The stairwell started out pretty boring. The first pictures are before we did anything to the house so you can still see the dark wood trim in the family room. The stairs themselves as well as the banister and trim along the walls were very dark wood, and the hallway and stairwell were the same boring, icky cream as the family room and kitchen.
This picture is while I was still priming the wood where I wanted to paint it. The risers didn't have any finish on them at all, so they just soaked the stuff up. It was oil based-primer, the same that we used on the trim in the family room. I decided to leave the banisters themselves as well as the newell post and the treads wood-colored to make the white really pop.

I don't even want to admit how long the stairs stayed primed with no paint on them! I was pretty burned out after all that detail work and icky oil-based goop. Thankfully Brett's mom stepping in during her visit in April and saved the day! We painted the stair treads, dowels and trim Benjamin Moore's "Frostine," the prettiest, brightest, most reflective white I could find. (There is no source of light in the stairwell--something I am trying to remedy.)

Here is a picture of the stumbling block in all of this. I wanted a modern sandy mushroomy putty-like brown for the walls to tone down the green in the family room and the yellow in the kitchen. I ended up with Benjamin Moore's "Tuscon Tan." I got it on the wall and HATED IT. It looked like someone skinned an Oompa Loompa and put him on my wall. It was the weirdest thing because the color looked so pretty in chip form, and its even one of Pottery Barn's colors and looks good in the magazine. I ended up taking it back and having them add pigment to the gallon until I ended up very close to the color I wanted, which turned out to be "Palm Desert Tan."

In this photo you can see the bright yellow in the kitchen. I love it, but it definitely needs neutrals to even it out. Another bright color near that one would be like Ronald McDonald's Playland or something!

And finally, voila: the final product. I really like it and I think it makes the stairs more of a focal point and less of a black hole area that is a nowhere land of decorating.


THE HALLWAY:

Before:

After:
Again, this hallway, which is connected to the stairwell, was just a nowhere land of decorating. It was that icky creamy color again that looked very boring. I continued the "Palm Desert Tan" up the stairs into the hallway and it looks SO GOOD! There is a LOT of the white trim with the numerous doorways in the hall that makes the color pop.So what do you guys think? Is it too dark? What kind of light fixture do you think I should go with for the stairs? I was considering sconces or pendants. I definitely don't have time at the moment to install wiring for sconces, as there is no outlet nearby to run the electricity from. I think it would look nice though. If I do pendants, I could repeat the same one in the upstairs hall for a nice cohesive look.

Tuesday, August 18, 2009