Well, we decided to go ahead with the bookshelf project, AND I GOT 12 of the PROJECTS DONE!!! That was pretty darn close to my goal of 13, no?
1. Replace overhead fixture in art/spare room.
2. Finish painting art/spare room.
3. Finish painting guest room.
4. Add homemade diffuser to bottom of drum shade a la here.
5. Sew cute dog crate cover.
6. Sew waterproof covers for outdoor furniture
7. Make unflattering Forever 21 dress into pretty skirt
8. Finish blanket for project linus
9. Finish chocolate brown crocheted pillow cover I blogged about
10. Turn all of my stretchy crew neck gap tshirts into Vnecks
11. Totally redo shoe storage
12. Revamp weird hexagonal lamp/table from For the Love of Jesus Thrift
13. Buy new knobs for my bathroom
14. Turn huge candle from TJ Maxx into pretty wooden fruit bowl
15. Revamp necklace storage
16. Make wedding shadowbox
17. Restore antique pew
18. Add handle to freestanding Ikea Pax pantry for laundry room
19. Replace hideous kitchen cabinet hardware
20. Attach legs and casters to storage ottomans to fit under our trestle table
21. Add magnetic closure to antique vanity drawer
22. Reupholster vanity bench
23. Finish subway art
24. Turn large body painting into tryptich.
25. Turn brass sections of Nana's navy lamps silver.
You guys have already seen the dog crate cover and the necklace holder, but I have a lot more to blog about now! I crossed off a couple of them, even though the project kind of morphed. For instance, I got the brass parts of the lamps covered, but am totally not satisfied with the look. So the project is technically "done" per my earlier goal, but to B's dissatisfaction it is still taking up the dining room table because I don't like how it turned out. More about that later.
I didn't add the casters to the ottomans...but I did buy decorative upholstery nails to add to them as well...so that project got bigger instead of done.
Also, I didn't exactly add magnetic closure to the vanity drawer...instead, I had my dad take a look at it and he said adding the closure might decrease the value of the antique. So instead he removed some little stop blocks someone had added to the inside of the drawer along its life, and greased up the current hardware, and it works like a charm.
ANYWAY...The BOOKSHELVES LOOK AMAZING!!! We went with Hemnes from Ikea, three without doors and two with, and they fit perfectly along the wall. We haven't "styled" them yet, but I am just so happy that there are no longer books EVERYWHERE.
Sorry no pictures today, but I promise some juicy ones soon.
xoxo
Charlotte
Tuesday, June 28, 2011
Monday, June 27, 2011
I've been busy...making prints!
 These photos are from the studio. I'll let you know when this edition of 30 linocuts will be available on my Etsy shop!
Friday, June 24, 2011
Poltergeist OR How Dominion Power Skeered the Little Green Kittens Out of Me
SCENE:
B and I are happily getting ready to warm up some blueberry muffins left over from the weekend first thing Monday morning. The coffee is done brewing (thank god). Then all of a sudden--FLASH, FLASH, FLASH, *powering down noise*. The scent of electricity (that makes your little nose hairs tingle) fills the air, followed by burning plastic.
END SCENE
No folks, our house was not built over a native american cemetery, so I immediately decided the wisest thing to do was cut off the power to the entire house and call George the electrician. Before breakfast. I asked him if he dealt in electrical mysteries, and happily he agreed to come out to our house on an emergency basis at 10am.
It turns out that the neutral wire from the transformer to our house broke, and that happens to be the one that regulates how fast power comes into your house.
After the utilities man came out, dug in our yard, dug in our neighbor's yard, and replaced the wire, here is what we ended up with:
NO oven (new, thankfully still under warranty)
NO microwave.
No bedroom TV
No cable
No internet
No bluray player
No dvd player
No fan in the bedroom
Thank the lord the power surge fairy did not bother our a/c, fridge or freezer or some heads wouldabeen rollin.
So the Fios people are coming out to look fix our cable/internet this afternoon, and GE is coming to fix the oven Monday.
George the electrician called me back Monday night and said, "well sweetie, you make'em pay for that!"
Here is one time when that Bar card will actually come in handy!
xoxo
Charlotte
Wednesday, June 15, 2011
One Point for Organization: Coarkboard Necklace Display
 I got them all up on the wall where I can see them! Can I even tell you how much better it is getting dressed in the morning when they aren't a tangled mess??
The beautiful framed coarkboard was $30 from Home Goods, and its huge.
 Now if only I could do the same for earrings and bracelets! But that, my friend, is for another to-do list...
Tuesday, June 14, 2011
Dog Crate Cover for Mack
Allow me to introduce you again to Mack, our rescue dachsund/border collie/who knows what sweetie. He sleeps in a crate in our room at night, and loves it to be covered with blankets like his personal little cave. It kind of reminds me of when you were little and wanted a fort under the kitchen table.

Here is a "before" photo of his crate with blankets draped over it per his liking. HOWEVER, not to my liking! I think it looked so sloppy and we needed our blankets back. (Don't worry, he normally has a pillow in there to sleep in, it was just in the wash when I took these pictures.)


I picked out this really cute, thick black and white dog-print fabric from our local fabric outlet U-fab, and went to town with the sewing machine.

I measured the back, sides, and top of the crate, and leaving a 1/2 inch seam allowance all the way around, I pieced it together and pinned it right-sides together.

Here you can see it partially done, with the back and top sewed together and one side pinned on.


Then I hemmed all the way around the edges...
 Here the crate is all nekked:

And here it is as the finished product.

I'm pretty sure he doesn't know the difference but I think it looks so much cleaner. The basket on the top is where we store his and Lolly's treats, brushes, etc. She sleeps on a dog bed on the floor (not so much of a fan of the crate as her brother!)
It was super easy! Let me know if anybody wants one as a christmas gift!
Here is a "before" photo of his crate with blankets draped over it per his liking. HOWEVER, not to my liking! I think it looked so sloppy and we needed our blankets back. (Don't worry, he normally has a pillow in there to sleep in, it was just in the wash when I took these pictures.)
So I decided to sew something nice and tailored to cover it up in a little bit of neater fashion. Voila the finished product:
I picked out this really cute, thick black and white dog-print fabric from our local fabric outlet U-fab, and went to town with the sewing machine.

I measured the back, sides, and top of the crate, and leaving a 1/2 inch seam allowance all the way around, I pieced it together and pinned it right-sides together.

Here you can see it partially done, with the back and top sewed together and one side pinned on.

And here is the almost-finished product: at that point I just had to sew it into a 3D shape. I left off the front so he could see out.

Then I hemmed all the way around the edges...
 Here the crate is all nekked:
And here it is as the finished product.

I'm pretty sure he doesn't know the difference but I think it looks so much cleaner. The basket on the top is where we store his and Lolly's treats, brushes, etc. She sleeps on a dog bed on the floor (not so much of a fan of the crate as her brother!)
It was super easy! Let me know if anybody wants one as a christmas gift!
xoxo
Charlotte
Monday, June 13, 2011


Friday, June 10, 2011
Two Ottomans and a Console


Thursday, June 9, 2011
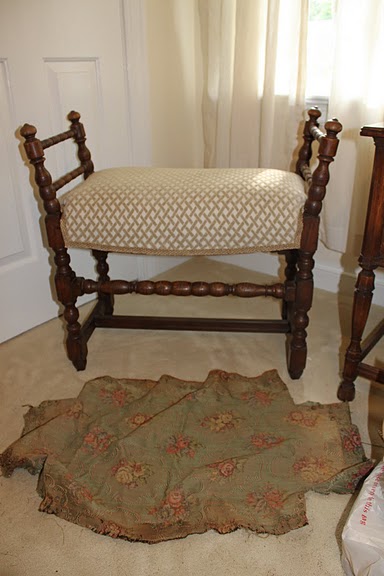
Vanity Bench Reupholstery Completed!
Here is the lovely, renewed vanity bench that goes with the vanity in my guest room. I love the turned wood handles that come up the side--I think that gives it such a unique shape. I can kind of imagine it in a medieval castle or something...

And here is what it looked like before, in our sad farmhouse. It needed a good shining up and new seat badly. I think the last person who upholstered it was my great-grandmother Hazel, probably in the 1950s. She used pretty nailhead trim, but I went the lazy girl's way with staples, trim and glue.

First I cut off the old seat and kept it for a template. I traced it onto brown paper.

Then I used the brown paper as a guide to cut out my new fabric--a pretty basketweave pattern tone-on-on tone with some stretch in it. I wanted my bench to be pretty cushy, so I made sure to keep about 3 extra inches all around to accomodate the new foam.

It had old upholstery straps on the bottom which were rotted away, so I threw them out an had my dad make me a new bottom with some plywood. Then I got a 4 inch piece of foam, cut it to size, and wrapped it with some quilt batting (crib mattress size).

I seem to be missing the picture of it done with the staples showing, but you can kind of see them in the photos below showing how I applied the trim. It was on sale at Hobby Lobby, and I got "about yea much" of it, figuring I could estimate how much I would need. HAH!
 See the staples? First I cut out 4 small pieces to go around the curved corners and glued them on, turning the end under and gluing it with hot glue so there wouldn't be any frayed edges.


And here is what it looked like before, in our sad farmhouse. It needed a good shining up and new seat badly. I think the last person who upholstered it was my great-grandmother Hazel, probably in the 1950s. She used pretty nailhead trim, but I went the lazy girl's way with staples, trim and glue.

First I cut off the old seat and kept it for a template. I traced it onto brown paper.

Then I used the brown paper as a guide to cut out my new fabric--a pretty basketweave pattern tone-on-on tone with some stretch in it. I wanted my bench to be pretty cushy, so I made sure to keep about 3 extra inches all around to accomodate the new foam.

It had old upholstery straps on the bottom which were rotted away, so I threw them out an had my dad make me a new bottom with some plywood. Then I got a 4 inch piece of foam, cut it to size, and wrapped it with some quilt batting (crib mattress size).

I seem to be missing the picture of it done with the staples showing, but you can kind of see them in the photos below showing how I applied the trim. It was on sale at Hobby Lobby, and I got "about yea much" of it, figuring I could estimate how much I would need. HAH!
See the staples? First I cut out 4 small pieces to go around the curved corners and glued them on, turning the end under and gluing it with hot glue so there wouldn't be any frayed edges.
Then I again folded under the edge of the trim and matched it up at a right angle with the pieces draped over the corners.

Here it is with one side done:
 AND HERE IS HOW MUCH TRIM I HAD LEFT OVER:

BOOYEAH! I must admit it would have made me feel a little bit better to have some more in case I messed up, but no harm no foul, right?

Here it is with one side done:
 AND HERE IS HOW MUCH TRIM I HAD LEFT OVER:
BOOYEAH! I must admit it would have made me feel a little bit better to have some more in case I messed up, but no harm no foul, right?
Here she is again, next to the old piece of upholstery. I removed. She is so happy that she is in a nice clean house and now our guests can use her to sit on to take on an off their shoes, or to apply their makeup at the vanity!

P.S. It really helps to have an extra hand when applying the trim with the glue gun. Thanks Anne!!
Subscribe to:
Posts (Atom)